Here is a shot of my first successful CG-5 Autostar setup
Red arrow points to added aluminum spacer described below
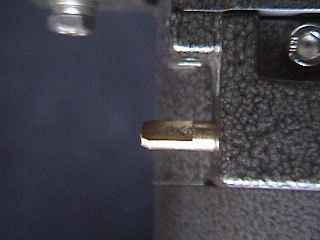
Camera and accessory rail visible on the left side of the scope
The telescope is a 120mm Synta Chinese refractor. Mine says Bresser Pulsar, but
the same scope is also available from Orion, Konus, Stardust and others.
Optics-wise it's sure not a Takahashi or a Tele-Vue, but is suprisingly good for the
money. I had to open up the OTA and clean out manufacturing debris from the inside
but after that was done it gave excellent performance.
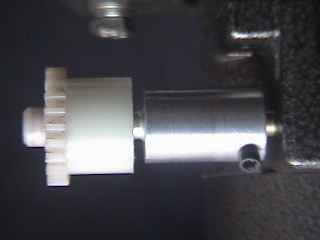
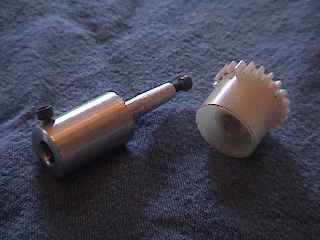
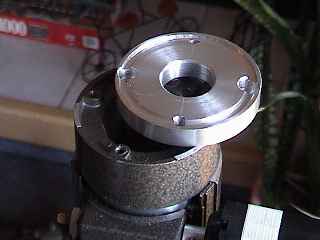
Closeup of CG-5/Autostar gear shaft adapter that I made
Two of these had to be created, one for each axis
They allowed me to attach a Meade DS-motor gear to the worm drive shafts of the CG-5
telescope mount. I machined the adapters from a single piece of 1/2" standard
aluminum
rod that I found in my machine shop junk box. The stem for the Meade gear is tapered
because the socket in the gear is tapered. The little black hex screw coming out of the
end
is used to secure the gear to the adapter. The second hex screw is the set screw that
secures the adapter to the CG-5's worm gear shaft. An alternative approach might
have
been to make up a hollow collar with two set screws and cutting off the Meade worm
drive's tapered end and then using the collar to attach the Meade gear and worm gear
shaft end to the CG-5's worm gear shaft. I liked my approach better, but not
everyone
has a lathe capable of cutting tiny tapered shafts in their garage! Stem on shaft
adapter
has been stroked with a coarse sandpaper along it's length in order to decrease the chance
of slippage of the Meade gear on the stem. Combined with the small set screw, I wasn't
taking any chances!
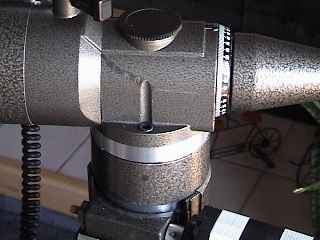
1/2" aluminum spacer for the right-ascension shaft
I added this spacer so the OTA ring mount
wouldn't hit the right-ascension
motor when the mount was slewing close to the celestial North pole in
polar-alignment or close to terrestrial zenith when in Alt-Az alignment. This
spacer is not required with my present approach, which has the Meade DS motors
mounted in the normal CG-5 motor position and uses gears to interconnect the
DS motors to the CG-5 worm drive shafts.
Of course, why not add motofocus too?
This is the Meade motofocus setup for the
DS series that has been
adapted to my 120mm scope. I had to machine a small aluminum block,
add two vertical threaded holes and two horizontal holes for the motor
assembly. The right focus knob had to be cut back on my lathe to clear
the motor. I also had to drill two holes in the scope's focus pinion gear
cover that matched up to the threaded holes in my little aluminum adapter
block. I had trouble keeping the gear mesh optimal, so I also added another
vertical bottomed-hole to the block on the right side. In the hole I placed a
small but very stiff coil spring and a plunger. I then slotted the right-side
horizontal screw hole so the motor assembly could be pushed down by the
spring. This made the motor assembly pivot on the left horizontal screw,
pushing the motor's gear into mesh with the focus knob gear.
The motofocus works great. The only
drawback is that the focus speed is
a fair-bit slower than I wanted. I suspect that the DS-series scopes have a
higher-speed focuser rack and pinion setup than my 120mm scope has.
I would have it be a tad slow than a tad fast!
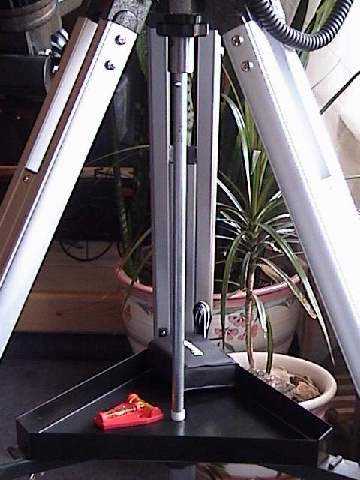
Last but not least, a vertical stabilizing rod.
The rod is solid plated-steel mostly
because that was what I found in
my junk box in my machine shop. A better approach would have
been to use an anodized aluminum tube, because it would have had
more flexure rigidity and been lighter as well. The bottom of the rod
has been drilled and threaded for a knob-bolt that is not visible
underneath. It allows me to leave the shaft in place, connected to the
mount head, when I take down and store the scope for travel. The
small white spacer at the bottom of the shaft allows me to gain assembly
and disassembly clearance.
I mounted the upper knob that came with
the mount in my lathe and
drilled and threaded a hole in it that allowed me to attach an intermediate
shaft to it. That shaft was in turn drilled and threaded with the larger hole
needed by the steel shaft.
One other thing I had to do was fix a
common reliability problem with the
Meade DS-Series telescope motors. The details can be found
here.